Difference between revisions of "Importing Data"
| Line 31: | Line 31: | ||
[[File:Edit Labels.png|frameless,300px|Add a custom label]] | [[File:Edit Labels.png|frameless,300px|Add a custom label]] | ||
| + | |||
| + | At the bottom left side, you can also set options for what you’d like CatalogIt to do with problems it encounters during the process: “Ignore Errors,” “Abort on Error, ” or “Map to Notes.” Map to Notes will map the data to the nearest Notes field depending on the property you’ve mapped to. | ||
| + | |||
| + | == Entry Audit Fields == | ||
| + | The Create Date, Created By, Update Date, and Updated By fields are automatically maintained by CatalogIt which records when and which authorized user Created or Updated an Entry record. These fields ARE NOT the place to record when an Object was created; use “Made or Created -> Date made -> Date” or similar fields for that information. | ||
Revision as of 03:13, 4 September 2019
Contents
CatalogIt Import User Guide
This user guide explains the CatalogIt Import process and the steps you can take to avoid pitfalls. Import is fairly robust and capable but does require understanding some basic principles and limitations to ensure success. The UI is functional but still needs some basic design attention and polishing. The data importing happens independently on the backend; as new Entries are created they are pushed to the frontend or client. Because of the independent and decoupled nature of how importing works, error reporting occurs via emails. If your counts after an import are not correct (or they are not what you expect) that is usually a sign that the import failed to complete successfully and you should look for an email containing details about the error(s). If an import fails mid-process any Entries that were already created will remain; you will need to delete them, correct the issue(s) in your source import data, and reimport. For this reason, importing into the “All Entries” Folder is not permitted -- you can only import into a Folder you’ve created (this is discussed in more detail below).
Prepare your Data
You can import data from either an Excel spreadsheet file (.xls and .xlsx) or from a CSV file (.csv). CSV is a universal format and many applications allow for export in CSV format. Import File Requirements
- Make sure that the first row is the header row. Each cell in this row should contain the “title” describing the information in each cell in that column.
- Make sure that all the data describing a single item, which will populate a single CatalogIt Entry, is in only one row and that there are no ‘merged’ cells.
- Remove blank rows at the bottom of your data or between rows of your data. Totally blank rows will be skipped by the import process but it’s best practice to keep your import data clean and as small as possible.
Classifications
CatalogIt contains a rich set of Classifications for modeling items (Art, Publication, Photograph, Object/Artifact, etc). You will want to divide your data into its basic Classification types and import each Classification set (a group of items all of one Classification type) separately. For instance, you’ll want to create a separate .csv file for artwork items to import into the CatalogIt “Art” Classification, another .csv file for your archival materials to import into the CatalogIt “Archive” Classification, yet another for “Object/Artifacts”, etc. You will import each of these files individually into CatalogIt to ensure a clean, comprehensive, high-fidelity import and to leave you in the best position for continuing to catalog these various types of items.
Import into new Folder
To import, you will need to either create a new Folder by selecting ‘New Folder’ from the Main Menu or map into another Folder you’ve previously created. We recommend creating a new Folder. Note: you cannot import into your CatalogIt “All Entries” Folder by design, as your All Entries Folder cannot be deleted. If there is a mistake while importing, you can simply delete a newly-created Folder and all of the Entries within it, re-create the new Folder, and re-import your file. Once you are ready to import, click on the Actions Menu in the upper right corner of your Folder and select “Import.”
New Records Only; No Updates
When importing Entries, the import process currently only "creates" new Entry records and will not "update" any existing records (or Entries). Some users reasonably think that if they're mapping the Entry/Object-ID, it should serve as an identifier and perform an update if the entry already exists. We're going to add support for “insert or update” (via a setting) but it's not currently part of the import functionality. If you have unique object IDs enabled (as most Museum accounts do) and you attempt to import the same file a second time (and you are mapping the Entry/Object ID), the import will fail from the attempt to add a duplicate entry (and you’ll receive an email stating as much).
Importing Entries and Profiles
You can import both Entries and Profiles. If you have Profiles that include a rich set of information (i.e. People, Businesses, Accessions, etc) you can import them in addition to importing the actual Entries. If you have Profiles to import, you’ll typically import them first by going to Profiles from the Main Menu and selecting the Profile you’ll be importing into. When importing Entries you’ll reference the Profile via its “name” property (Profile names must be unique)-- i.e. your Entry import data will contain a column that references the Profile’s name and you’ll map this column to the appropriate Profile field.
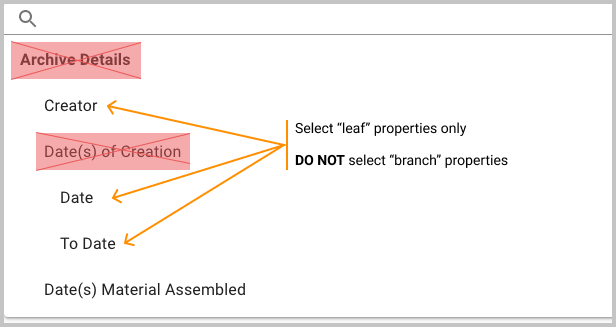
Select Leaf Properties Only
When configuring your mappings you must map your columns to "leaf" properties in the Property tree. “Leaf” properties have no children vs. “branch” properties which have children indented below them.
Exception: There is one instance when you may select a bold “branch” property when mapping your import columns to the CatalogIt Property tree. If you have a single import column that contains multiple dimensions (like 15”w X 10”h) you can select the Dimension branch item and CatalogIt will attempt to intelligently parse that field and automatically identify and set the individual dimensions; if any dimensions are uninterpretable, the original import value will be written to the Dimension Notes field.
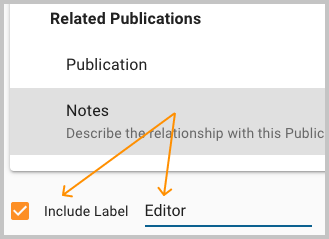
TIP: Mapping to the "Notes" fields for any given section works very well - don’t be hesitant about doing that. Notice that you can also include a custom label via the “Include Label” checkbox which will serve to identify the information.
At the bottom left side, you can also set options for what you’d like CatalogIt to do with problems it encounters during the process: “Ignore Errors,” “Abort on Error, ” or “Map to Notes.” Map to Notes will map the data to the nearest Notes field depending on the property you’ve mapped to.
Entry Audit Fields
The Create Date, Created By, Update Date, and Updated By fields are automatically maintained by CatalogIt which records when and which authorized user Created or Updated an Entry record. These fields ARE NOT the place to record when an Object was created; use “Made or Created -> Date made -> Date” or similar fields for that information.

